


Before projectLUMA there was KUDA. KUDA Shaders was one of the well-known realistic packs of the OptiFine era, made by DeDelner. When he came back to shaders after a break, he did not patch the old code. He started again from scratch, and the result, projectLUMA, is described on its official page as the official successor of KUDA-Shaders. If you still have an old KUDA folder lying around, this is the pack its author wants you to move to.
The new pack had a different brief. DeDelner’s stated goal was graphics that do not distract from gameplay, at a low performance cost, while still looking decent. So LUMA is realistic, but it does not try to be the heaviest pack on your drive.

What the pack actually draws
The feature list on the project page is short and concrete: photorealistic skyboxes, god rays, reflections, PBR support, ambient occlusion, native motion blur, realistic water waves, a dirty lens effect, auto bump and POM (parallax occlusion mapping).
Two of those are matters of taste. Motion blur smears the picture when you turn quickly, which some players love in screenshots and hate in combat. The dirty lens adds smudges to bright light, the sun included. If either annoys you, look for them in the shader options before blaming the pack.

PBR support and POM only pay off with a resource pack that ships normal and specular maps. With plain vanilla textures, auto bump gives blocks a bit of depth instead. Browse our resource packs if you want to try a PBR set on top.

Light, but not the lightest
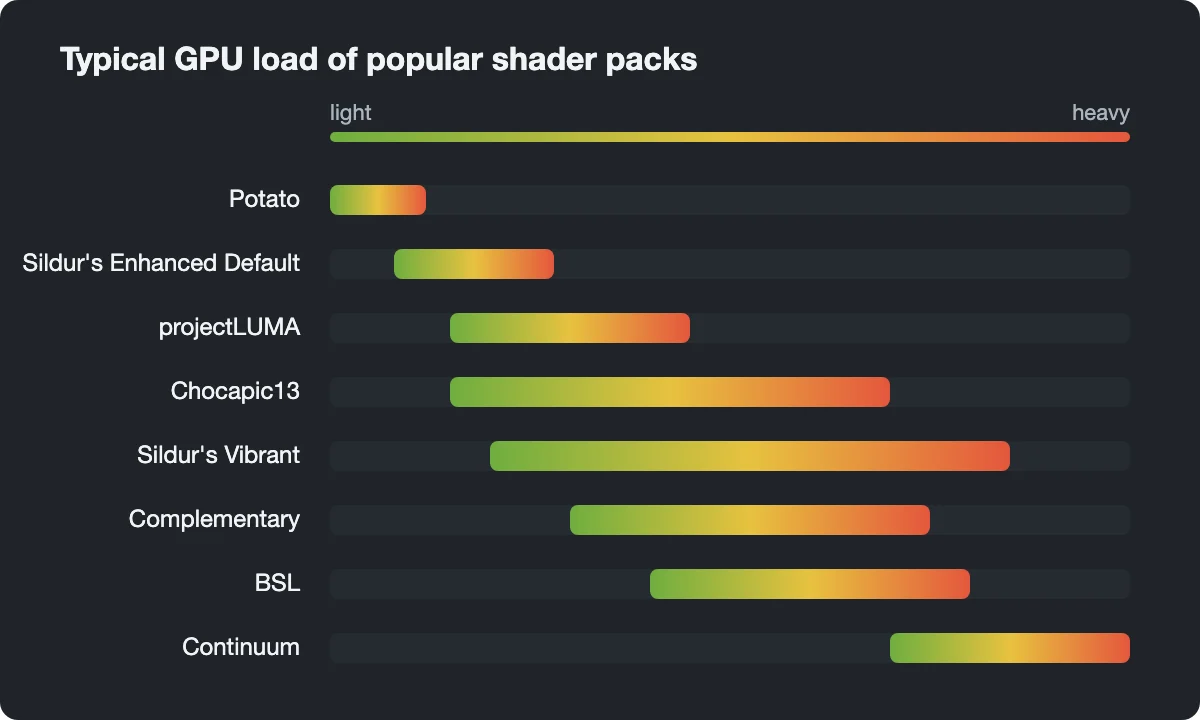
On our rough chart projectLUMA sits in the lower middle. It costs more than Sildur’s Enhanced Default, which keeps vanilla colors, and less than the upper versions of Chocapic13. That makes it a sensible first realistic pack on a gaming laptop or an older dedicated card.
Who should skip it? Players after thick volumetric fog, glowing sunsets and colored torchlight. LUMA keeps those effects modest by design, and a heavier pack such as BSL will give you more drama for more GPU time.
On integrated graphics, start with the lighter packs and lower the render distance first. Our guide on boosting FPS in Minecraft lists the settings that matter most.

OptiFine first, Iris second
projectLUMA was written for OptiFine, and the author asks for the latest OptiFine build, warning that preview versions are less stable. The last public release on the official page is v1.32 from December 2019, listed for 1.12 through 1.14.4. It is a hobby project, so do not expect regular updates.
- Install OptiFine for your game version and start its launcher profile.
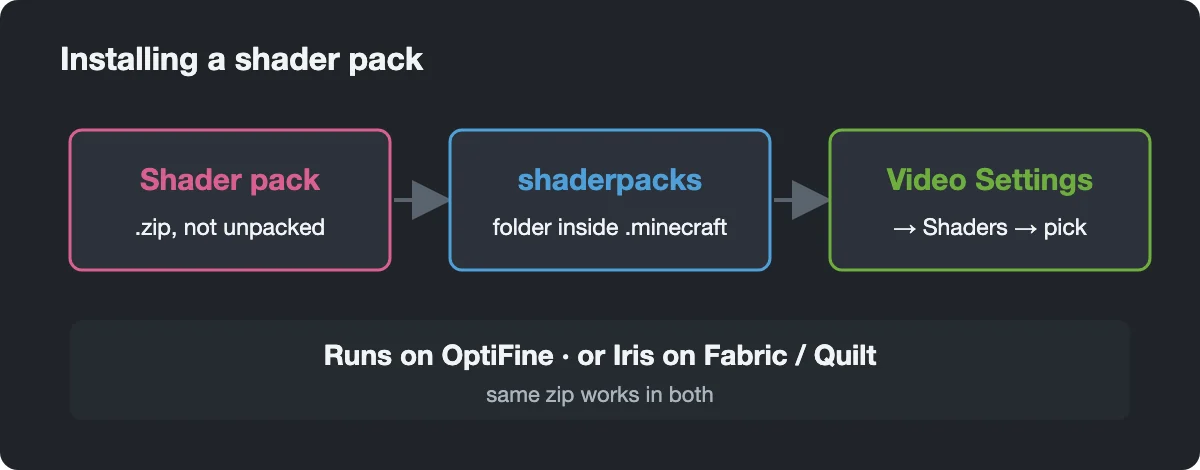
- Open Options, Video Settings, Shaders, then the shaderpacks folder.
- Put the projectLUMA zip there as it is, without extracting.
- Pick it in the list and wait for the world to reload.
With Iris and Sodium on Fabric the folder is under Video Settings, Shader Packs. Iris is meant to run OptiFine packs and LUMA is not on its list of known broken ones, but the author only names OptiFine, so on recent Minecraft versions treat Iris support as untested.
Ok
bekar shader
When i used these shaders the skybox was all funky. I have no idea how to fix this.
how to use these shaders, when I open Minecraft there are no shaders and I download these shaders on my cellphone
Hi
ok